Welcome to Network Prototype Simulator Page.
Network Prototyping Simulator is a simulation system that expands Mininet network emulator to computer cluster. That allow us to reproduce the network with such an amount of nodes that hardly was possible before. The maximum size of network topology in NPS depends on number of cluster nodes with Mininet instances. One cluster node can emulate more than thousand hosts, and an modern server could execute at least 15 cluster nodes packed in virtual machines. As the result, we get about 15 thousands hosts per server. The scalability of NPS makes it possible to emulate really big networks.
By the architecture, NPS saves features of Mininet, so it does not become a clear simulation system, it remains a network prototyping system. Means one could trust the results of such simulation and there is no need to prove correctness and adequacy of the model built.
NPS Quick Start Guide
NPS architecture
NPS setup has two types of nodes: "cluster" node and "control" node. Currently both are packed into virtual machines. Naturally cluster setup consists of one control node and many cluster nodes. Virtualization system used is Oracle VirtualBox.Creating Cluster Node VM
- Create VM with 1 CPU core, 1Gb of RAM, 6.2 Gb disk space and two NICs (eth0 - for control, eth1 - for cluster data exchange). Set 1st NIC initially as NAT, 2nd as "Internal network" and allow "Promicious Mode: Allow All"
- Install the Ubuntu 13.10 64-bit OS using ISO file from the ubuntu site
- Change the root password to "root":
$sudo passwd root
- Make a directory for storing cluster node startup scripts:
$mkdir -p /home/clusternode/MininetScripts
- Poweroff created VM and clone it. Thus making a backup copy in case you decide to redo software installation
- Boot clone and install necessary software:
#apt-get install python-scapy mininet
- Also one can install debug and development software of choice, f.e.:
#apt-get install vim mc strace tcpdump netcat nmap
- Install Mininet:
#apt-get install mininet
- Copy Mininet services script to Mininet folder:
#cp path/to/NPS/config/services.py root@clusternodename:/usr/share/pyshared/mininet/#cp path/to/NPS/config/services.py root@clusternodename:/usr/lib/python2.7/dist-packages/mininet/
- Poweroff machine and clone this VM as many times as you need nodes in your cluster. Reconfigure eth0 on each of clones as "bridged adapter, virbr0"
Working With VM Clones
Boot each of cluster nodes and proceed with following updates
- Update properly node name in /etc/hostname and /etc/hosts. For n001 it would look like:
/etc/hostname:
n001
/etc/hosts:
[..]
127.0.0.1	n001
10.0.2.101	n001
10.0.2.102	n002
10.0.2.201	ccnode
[..]
- Check /etc/NetworkManager/NetworkManager.conf for switching off control of managed interfaces:
/etc/NetworkManager/NetworkManager.conf
[..]
[ifupdown]
managed=false
[..]
- Update network configuration /etc/network/interfaces:
/etc/network/interfaces:
[..]
manual eth1

auto eth0
iface eth0 inet static
	address 10.0.2.101
	netmask 255.255.255.0
[..]
- In case you generate clusternodes after control node don't forget to place ssh keys properly. Described below.
Creating NPS control node
As the basis for NPS control node we used Ubuntu Desktop 13.10 distribution. You can find an installation medium on Ubuntu site. For NPS control node one needs amd64 architecture install CD.- Create Virtual Box machine (will be refered as ccnode further) with 2 cores CPU, 4Gb of RAM, 32GB disk, 2 ethernet interfaces. First one (eth0) will be used to communicate with cluster nodes and has to be set as "bridged adapter, virbr0". The second NI (eth1) would be advisable to use as "NAT-ed" interface to communicate with Internet. Further we assume setup of a sample cluster consisting of one control node ccnode and two cluster nodes n001 and n002.
- Install Ubuntu Desktop 13.10 distribution on this machine, customize according to your taste with your favorite tool set and update it. Set root's password for "root" and create a user mininet with password "mininet". Make a backup copy of blank control node. This could spare you system installation step in case you decide to recreate control node.
- After reboot proceed with changing /etc/hostname and /etc/hosts
/etc/hostname:
ccnode

/etc/hosts:
[..]
10.0.2.201	ccnode.mn-cnet	ccnode
10.0.2.101	n001.mn-cnet	n001
10.0.2.102	n002.mn-cnet	n002
[..]
- For persistent network configuration one needs to update /etc/network/interfaces file with description of eth0 and eth1. Also check NetworkManager to be switched off for managed network interfaces.
/etc/network/interfaces:
[..]
auto eth0
iface eth0 inet static
	address 10.0.2.201
	netmask	255.255.255.0

auto eth1
iface eth1 inet dhcp
	dns-nameservers 8.8.8.8

[..]

/etc/NetworkManager/NetworkManager.conf:
[..]
[ifupdown]
managed=false
[..]
- Generate ssh keys for mininet user on ccnode and place public parts to .ssh/authorized_keys for users root and mininet users on nodes. NPS scripts need access to cluster nodes. For details f.e. see this miniarticle SSH login without password .
- Install development soft necessary for installation of some fresh software pieces from tarballs
apt-get install python-networkx python-matplotlib python-paramiko
apt-get install cmake default-jdk git ant libgl1-mesa-dev freeglut3-dev libgstreamer0.10-dev libgstreamermm-0.10-dev libwebkitgtk-dev
- Install METIS library. Download sources of latest stable METIS 5.1.0. Put tarball in /home/mininet/metis dir and untar there. Edit metis-5.1.0/include/metis.h and proceed with compilation.
include/metis.h:
[..]
IDXTYPEWIDTH 64
[..]
Compile and install:
$make config shared=1
$make
$sudo make install
$sudo ldconfig
- Install floodlight SDN controller. Download sources of latest floodlight 0.90. Unpack tarball in /home/mininet/floodlight and launch ant in floodlight's source directory. For purposes of NPS floodlight.jar can be left in build directory without honest system install.
$ cd floodlight-0.90
$ ant
- For NPS GUI one needs wxPython. Download sources of wxPython-2.9.5. Unpack tarball in /home/mininet/wxPython. One of build scripts need some little fixing and after that wxPython can be built and installed.
/home/mininet/wxPython/wxPython-2.9.5.0/build/tools/builder.py:
[..L121..]
	if options:
		args.extend(options)
[..]
[..L134..]
	if options:
		args.extend(options)
[..]

$cd /home/mininet/wxPython/wxPython-2.9.5.0/wxPython
$sudo python2.7 build-wxpython.py --build_dir=../build-wxPython/ --install
$sudo ldconfig
- Download sources of NPS into /home/mininet/nps directory.
$ cd /home/mininet/nps
$ git clone https://github.com/ARCCN/nps.git
- Fill properly /home/mininet/nps/`/config/nodelist.txt. It contains description of cluster nodes in format one node per string and string has a sequence of fields as: [nodeIP] [hostname] [root password] [mininet's devoted networking device] [SDN controller IP] [SDN controller port]
/home/mininet/nps/nps/config/nodelist.txt:
10.0.2.101 n001 root eth1 10.0.2.201 6633
10.0.2.102 n002 root eth1 10.0.2.201 6633
- Last step of control node creation procedure is to update NPS configuration constants file /home/mininet/nps/nps/config/config_constants.py
/home/mininet/nps/nps/config/config_constants.py:
[..]
nps_PATH = '/home/mininet/nps/nps'
CONTROLLER_PATH = '/home/mininet/floodlight/floodlight-0.90/'
SRC_SCRIPT_FOLDER = nps_PATH + '/scripts/'
DST_SCRIPT_FOLDER = '/home/clusternode/MininetScripts/'

MALWARE_CENTER_IP = "10.0.2.201"
MALWARE_CENTER_PORT = 56565

FIRST_HOST_IP = '1.2.3.1'

CLUSTER_NODE_MACHINE_NAME = 'n001'
SCRIPT_FOLDER = 'scripts/nodes/'
REMOTE_CONTROLLER_IP = '10.0.2.201'
REMOTE_CONTROLLER_PORT = '10.0.2.201'
[..]
After that steps You can run NPS GUI using python2.7 interpreter
$python ./NPSGUI.py
Simple Workflow
- In case of need to change the set of cluster nodes one can change config/nodelist.txt file according to rules mentioned in "Creating NPS control node". Launch properly adjusted set of cluster node VMs.
- Create (or use existing) input Mininet script with custom topology creation. The example of such script is in the standard Mininet distribution in _custom/topo-2sw-2host.py
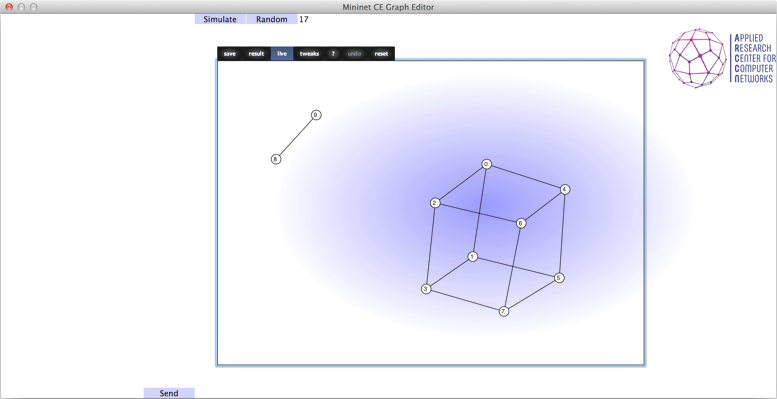
- Run NPS GUI
$ python ./NPSGUI.py
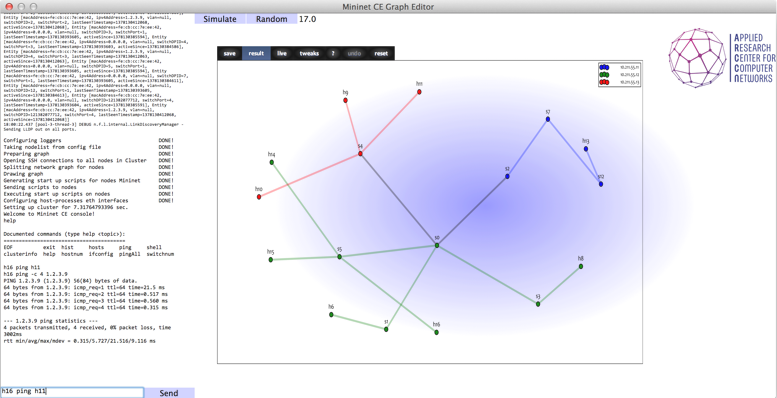
- Interact with NPS cluster network. Console window is located on lower left corner of main window For example:
NPS> help
NPS> h1 ping h2
NPS> h1 ifconfig
NPS> hosts info
- Close the NPS
NPS> exit
Support or Contact
Having trouble with NPS? Contact vantonenko@arccn.ru.
Useful Hints
If you needed to draw in NPS GUI graph size of more than 500 nodes. You need to provide some fixes in NetworkX library.
In "/usr/lib/pymodules/python2.7/networkx/drawing/layout.py", change the code in line 233
A=nx.to_scipy_sparse_matrix(G,weight=weight)
to
A=nx.to_scipy_sparse_matrix(G, weight=weight,dtype='f')
Source: here.
Authors
Antonenko Vitaly
ARCCN, Moscow
vantonenko@arccn.ru, anvial@lvk.cs.msu.su
Andrey Nikolaev
ARCCN, Moscow
anikolaev@arccn.ru, gentoorion@gmail.com
Special Thanks
Special Thanks go to the following for their help and support in the development of NPS system:
LJYBowser
Enjoy the simulation with NPS!